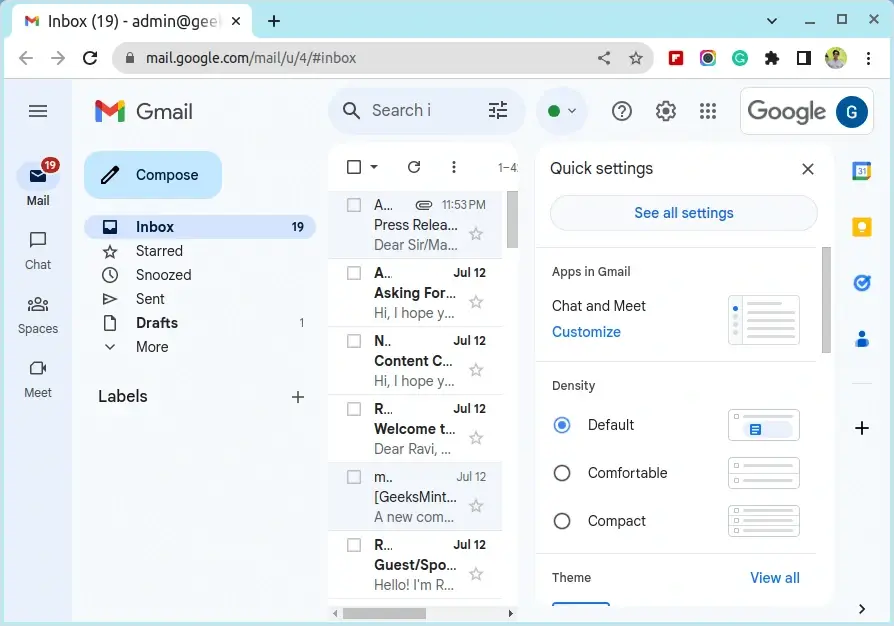
In today’s busy world, email communication is a big part of our daily life, and Gmail stands out as one of the most popular platforms, boasting a staggering user base of 1.8 billion – a significant fraction of the global population.
Gmail has lots of cool features and functionalities, However, only a handful of people truly grasp how to navigate its depths and optimize their productivity to the fullest.
Are you one buried under a pile of emails? Having trouble keeping up with all the unread messages and staying on top of things?
Don’t worry! In this article, we’ll check out some helpful Gmail tricks that will turn you into an email pro.
1. Create a Gmail Alias
Creating a Gmail alias can be especially convenient if you possess multiple email addresses and desire a time-saving method of managing all your messages within a single platform.
For instance, let’s consider a scenario where you have two email addresses: “[email protected]” and “[email protected]“. Here are the steps to establish a permanent alias for the latter, ensuring that any emails sent to “[email protected]” are automatically forwarded to “[email protected]“.
Once successfully logged into Gmail, locate and click on the gear icon and click the Settings in the top-right corner of the screen.
A drop-down menu will appear, select “See all settings“.
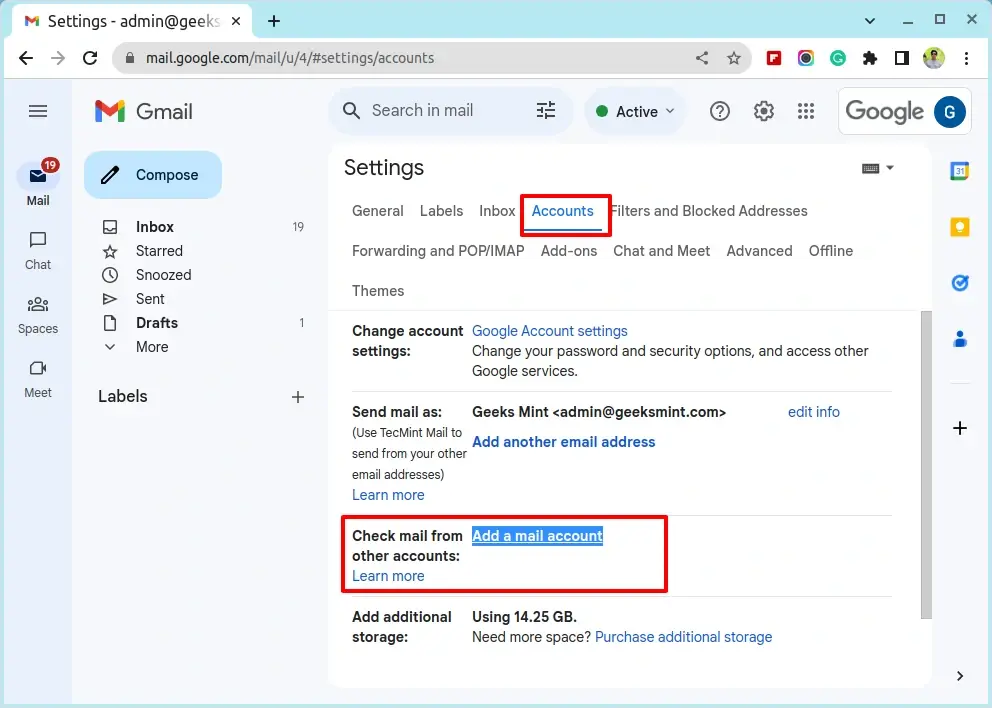
Inside the Settings menu, locate and navigate to the “Accounts” tab. Scroll down to the section “Check mail from other accounts” and click on the “Add a mail account” option.
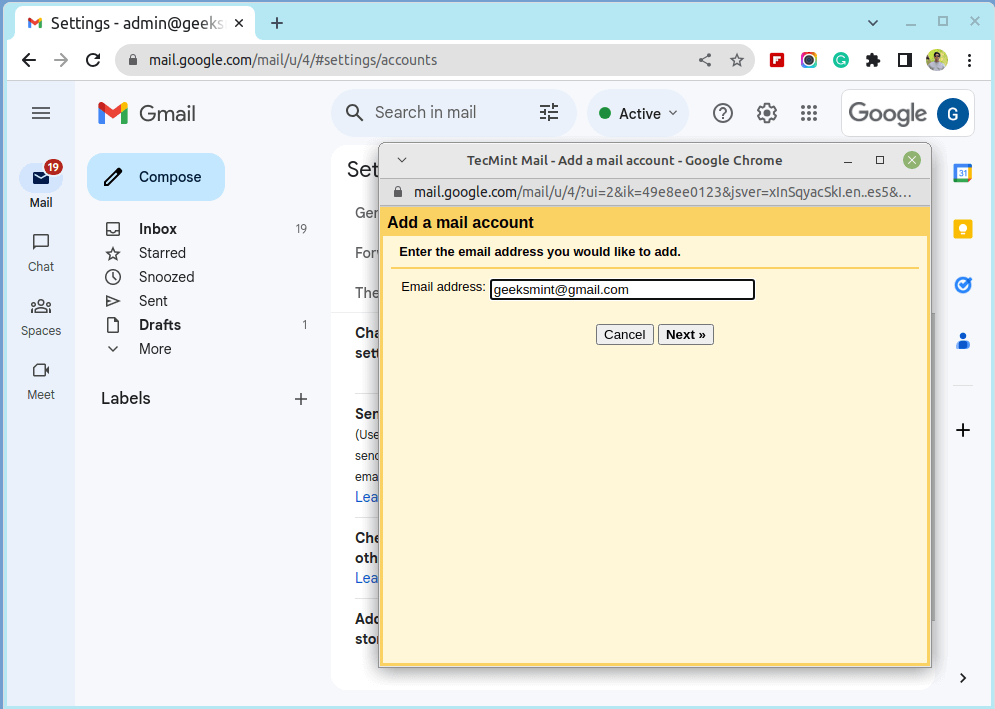
A new window will appear, prompting you to input the email address you wish to create as an alias. In this case, enter “[email protected]” and click the “Next” button to continue.
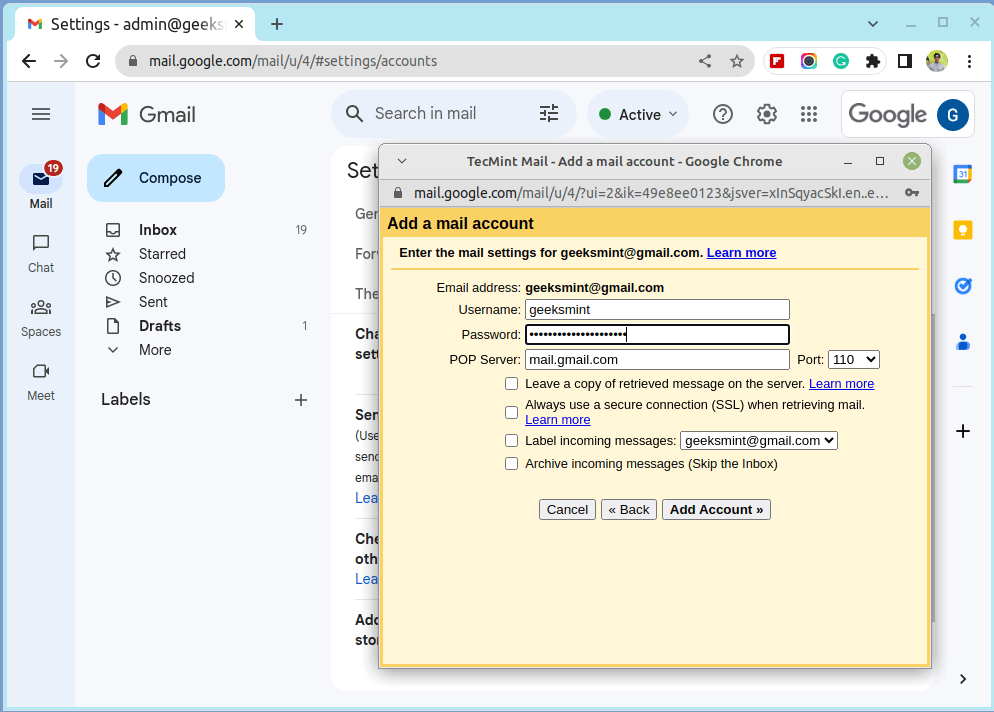
In this window, you will be prompted to enter the password for the email address you wish to add as an alias. Take note that the password being referred to here is the one you use to log in to the specific email address and its respective account.
Once you have entered the password accurately, proceed by clicking on the “Add Account” button.
Follow the provided instructions to verify your ownership of the email address “[email protected]“. Typically, this involves clicking on a verification link that will be sent to the specified email address.
Once you successfully complete the verification process, Gmail will establish the alias. Consequently, you will be able to send emails from your primary Gmail account while utilizing the “[email protected]” address as an alternative alias.
Furthermore, any emails directed to “[email protected]” will automatically be forwarded to “[email protected]“, allowing you to conveniently access and manage all your email correspondence within your primary Gmail account.
By adopting this approach, you can efficiently manage multiple email addresses, consolidate your communication channels, and enjoy the convenience of having all your messages easily accessible in one centralized location.
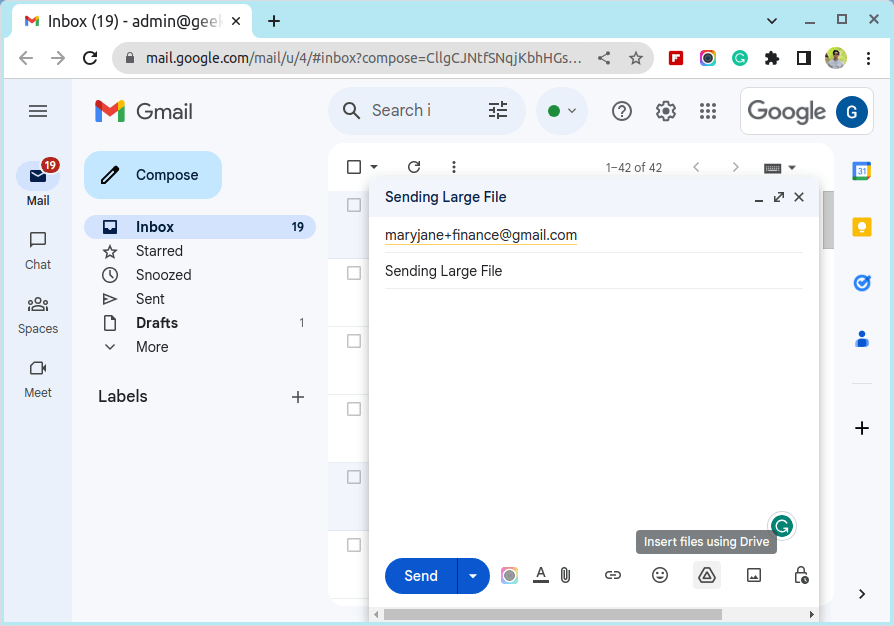
2. Send Large Files on Gmail
By default, the attachment limit for Gmail is 25MB, which means that you can only attach documents that do not exceed 25 MB. If your file(s) is greater than the set limit, Gmail automatically adds a Google Drive link to the email instead of including it as an attachment.
So, what do you do if your files are larger than 25MB? The workaround is quite simple.
Simply upload the huge file to Google Drive. Next, compose a new email and click the Google Drive link which will direct you to the uploaded file.
3. Enable Auto-Advance in Gmail
To enable the Auto-Advance feature in Gmail, which automatically takes you to the next email after you archive, delete, or mute a conversation, you can follow these steps:
Open Gmail and sign in to your account, then click on the gear icon located in the top right corner of the Gmail interface, which will open the Settings menu.
From the dropdown menu, select “See all settings“.
In the Settings page, navigate to the “Advanced” tab. Scroll down to the “Auto-advance” section and select the Enable radio button.
Once you’ve chosen your desired Auto-Advance setting, scroll to the bottom of the page and click on the “Save Changes” button to apply the new setting.
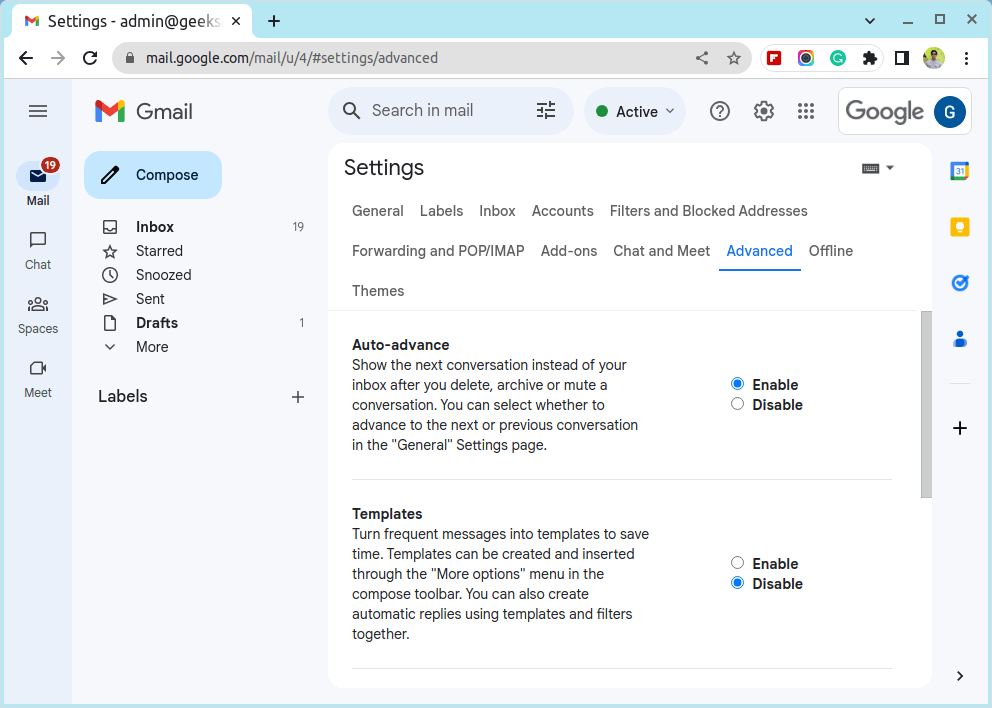
After enabling Auto-Advance, whenever you take action on an email, such as archiving, deleting, or muting a conversation, Gmail will automatically load the next email based on your chosen Auto-Advance option.
4. Schedule an Email in Gmail
Sometimes, you might want to schedule sending an email for a later time, which could be due to the time difference between you and the recipient who lives in a different time zone. Scheduling emails is also convenient for people who work odd hours.
To schedule an email in Gmail, click on the “Compose” button to create a new email and enter the recipient’s email address, and subject, and compose the content of your email as you normally would.
Now, instead of clicking on the “Send” button, click the down arrow next to the Send button and select “Schedule send“. You will be presented with a list of suggested times or the option to choose a custom date and time.
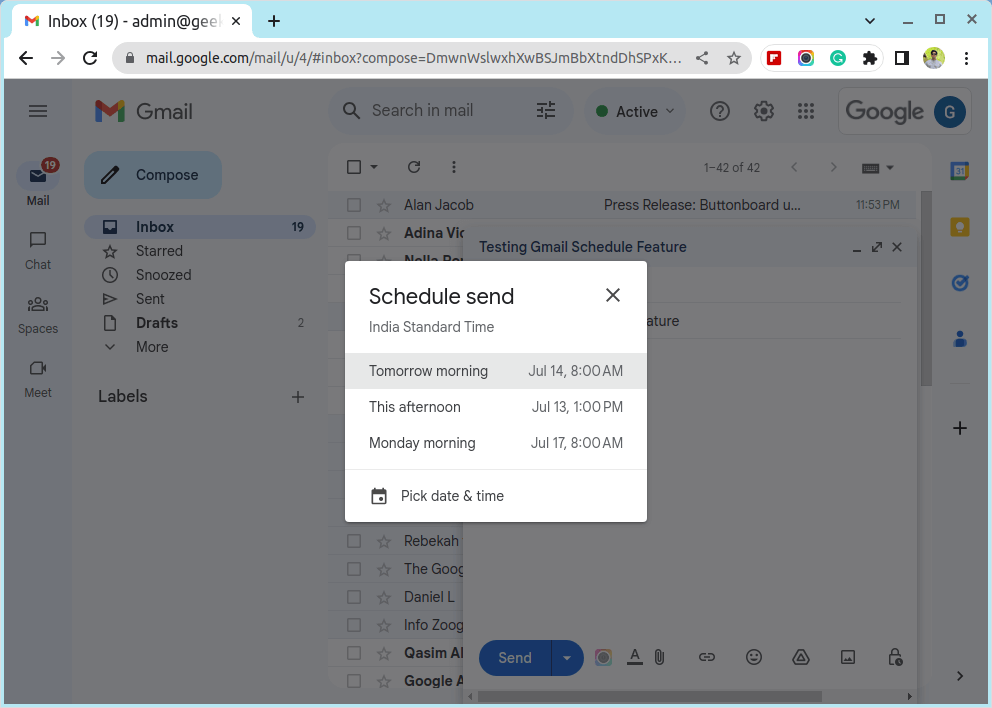
Once you have selected the date and time, click on the “Schedule send” button to confirm and schedule your email.
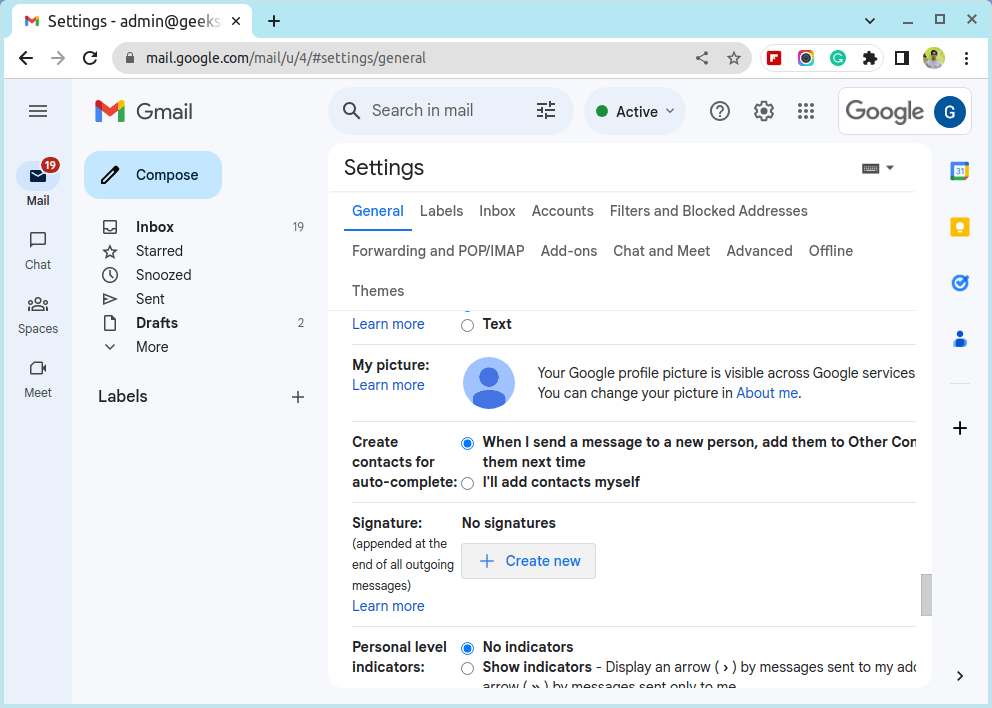
5. Create Multiple Signatures in Gmail
You can create multiple email signatures for different groups of recipients. To do so, click the ‘Settings‘ icon, followed by ‘See all Settings‘.
Next, click the ‘General‘ tab and navigate to the ‘Signature‘ section. If you don’t have a signature already, you will need to create one by clicking ‘Create New‘.
Below is a sample email signature.
You can add multiple signatures by, once again, clicking the ‘Create new’ button and filling out your signature. When composing a new email, you can select your preferred email signature.
Once you are done, scroll all the way down and click ‘Save Changes‘. The next time you compose an email, click on the ‘Signature‘ icon and select your preferred signature name which will insert the associated signature at the bottom of the email.
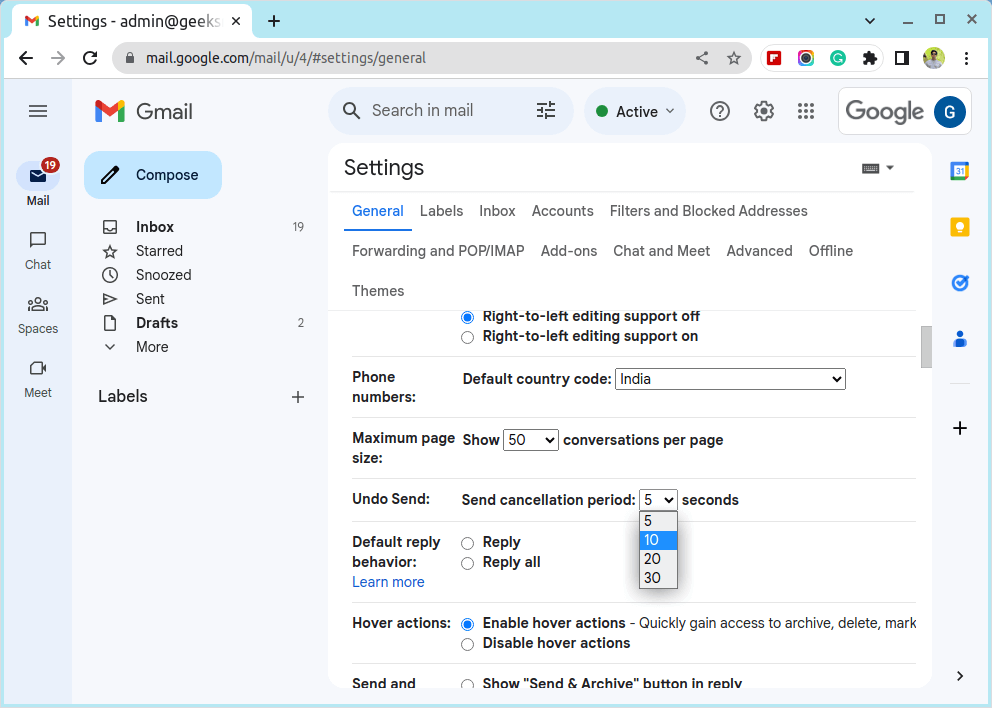
6. Undo a Sent Email in Gmail
Have you sent an email by mistake? Or perhaps forgot to include all the details? Or maybe you sent it to the wrong person. If that’s the case, worry not. Gmail also allows you to retract a message right after sending it.
Retracting an email is an easy peasy procedure. However, the default settings for Undo Send only allow one to retract or cancel an email that has been sent not more than 5 seconds ago.
To adjust the time during which you can undo a sent message click the ‘Settings‘ icon and then select ‘All Settings‘. Next, scroll and locate ‘Undo Send‘. You can then set the cancellation time to 5, 10, 20 & 30 seconds.
Scroll all the way down and click ‘Save changes‘. To give it a test run, compose a test email and click the ‘Undo‘ button to retract the email.
7. Create Email Templates in Gmail
Composing the same email over and over again is arduous and time-consuming. If you are in the habit of composing the same email constantly, creating a template will help you save both time and energy.
In the ‘See All Settings‘ page, click the ‘Advanced‘ tab and then Enable the template feature as indicated. Then click ‘Save Changes‘.
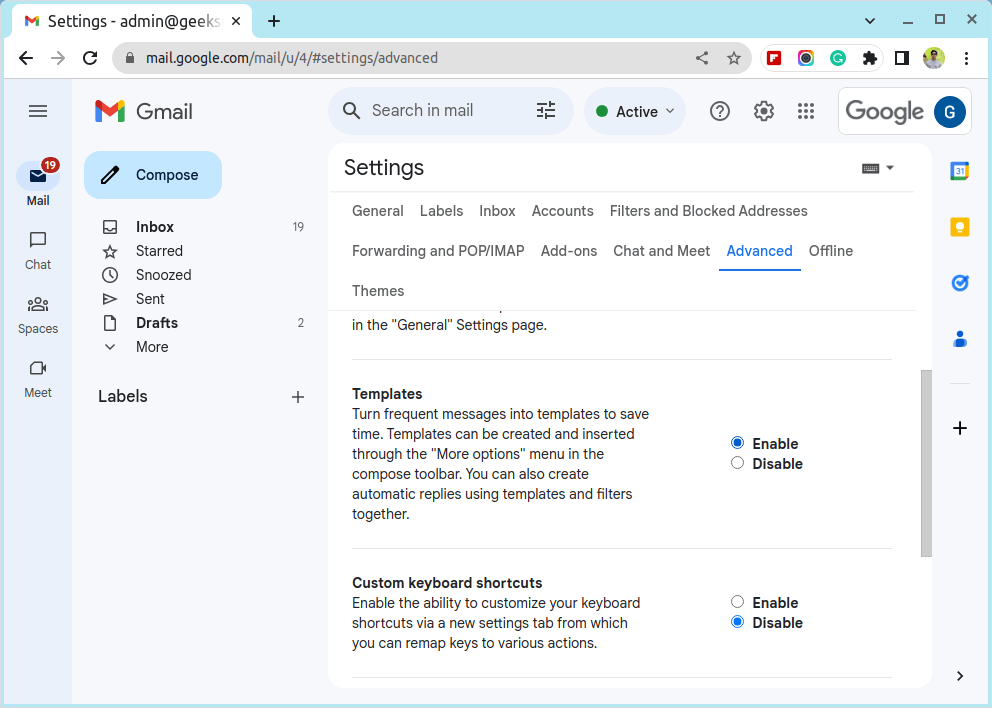
Next, click on “Compose” to open a new email window, then click on the three-dot menu icon located at the bottom right of the compose window. From the menu, hover over “Templates” and then select “Save draft as template” followed by “Save as new template“.

A pop-up window will appear where you can enter a name for your template. Choose a descriptive name that will help you identify the template easily.
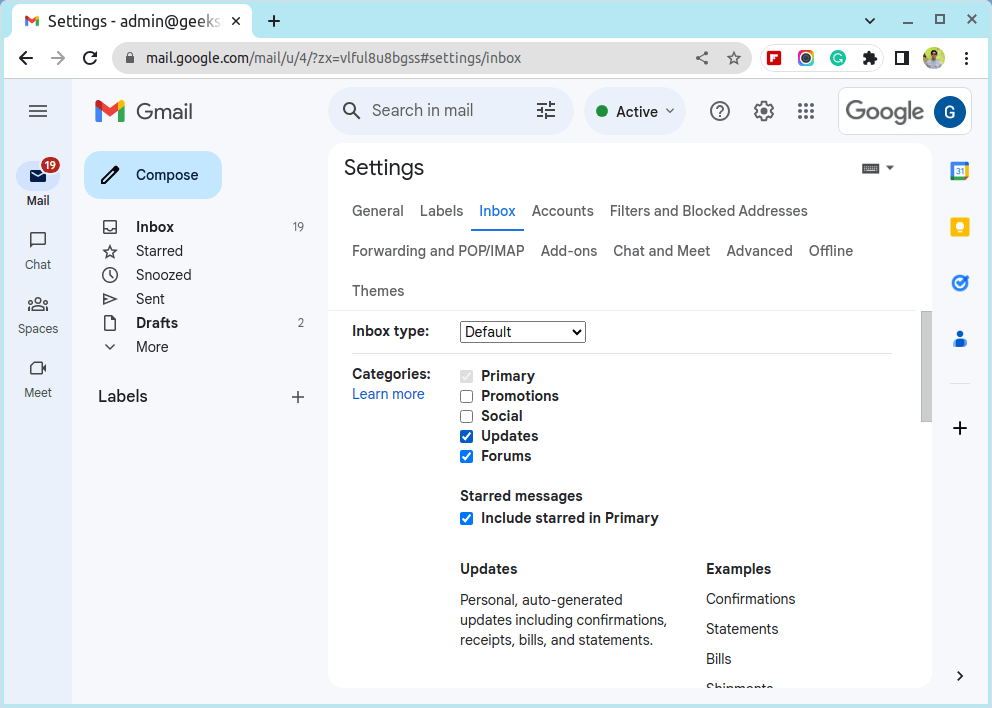
8. Organise Gmail Tabs
Gmail intelligently categorizes your inbox into several categories that are presented as tabs. By default, there are three tabs: Primary, Promotions, and Social.
The ‘Primary‘ tab contains emails that are considered important and, hence, the first priority. The ‘Promotions‘ tab, as the name implies, contains promotional messages whereas the ‘Social‘ tab contains emails from social media pages.
You can add or remove tabs as you deem fit. To do this, click the ‘Settings’‘ icon then select ‘See all Settings‘. Next, click the ‘Inbox‘ tab. In the “Inbox type” section, select Default.
Next, check off the categories that you want to display as Tabs. In this example, we have checked off the ‘Updates‘ and ‘Forums‘ categories.
Then scroll down and click ‘Save Changes‘ to apply the changes made. This time around all the tabs will appear as shown.
9. Enable Message Preview Pane in Gmail
Usually, clicking an email on your inbox expands it in such a way that the email contents fill up the entire inbox area.
To go back, you need to click the back arrow or the inbox option on the left sidebar. This can be time-consuming and cumbersome if you are going to preview multiple email messages.
A faster solution is to configure Gmail to display a preview pane that appears either at the right or bottom of the inbox area.
To do this, click the ‘Settings’ icon again and select ‘See all Settings‘. Next, click the ‘Inbox‘ tab then scroll to the ‘Reading pane‘ section and check off the ‘Enable reading pane‘ option.
Then scroll down and click ‘Save changes‘.
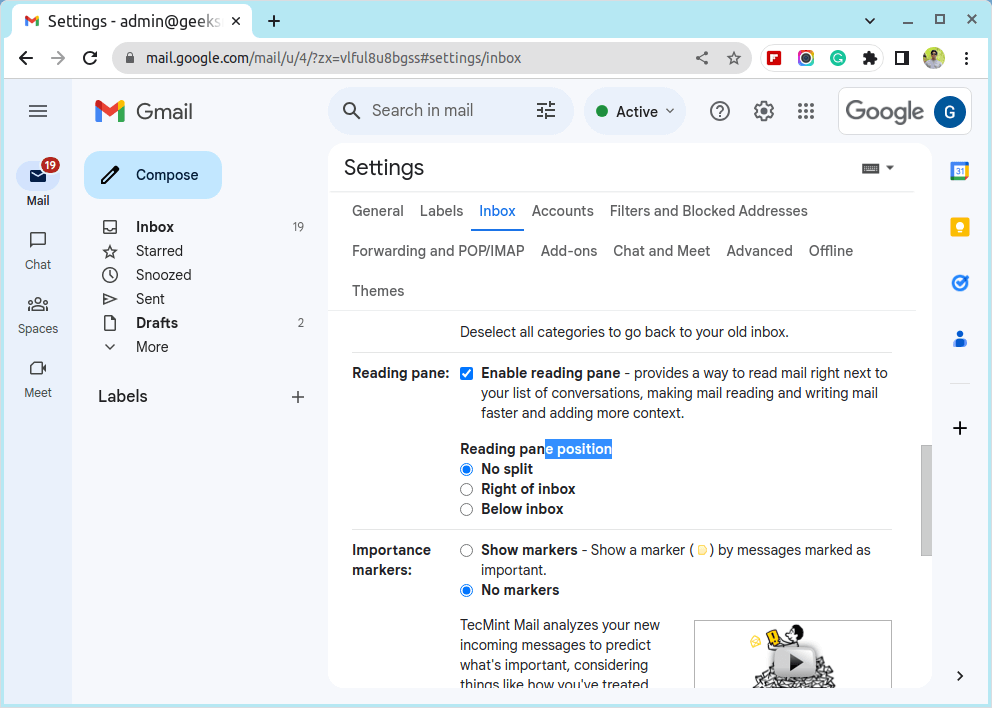
Now back to the main interface click the ‘Toggle split pane mode‘ option and select either vertical or horizontal split.
The image below is a depiction of the vertical split orientation with the email details appearing on the reading pane to the right of the inbox emails.

10. Create Email Filters in Gmail
Filters are rules that dictate how Gmail handles incoming mail. These rules form the basis of how Gmail manages emails by organizing the inbox in the best way possible to avoid clutter.
Filters provide a myriad of powerful filtering options that let you banish unwanted emails such as marketing and promotional emails.
You can archive, forward, delete, and apply other rules to incoming emails to ensure that only essential emails get your attention.
Open the Settings menu, and from the dropdown menu, select “See all settings“ and click on the “Filters and Blocked Addresses” tab located at the top.
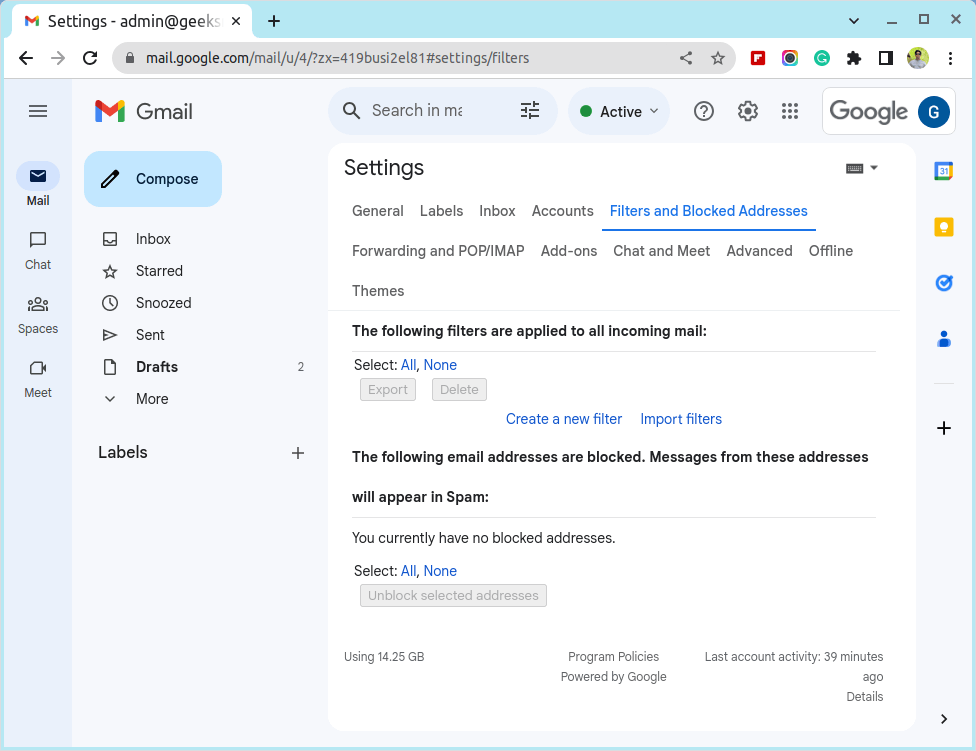
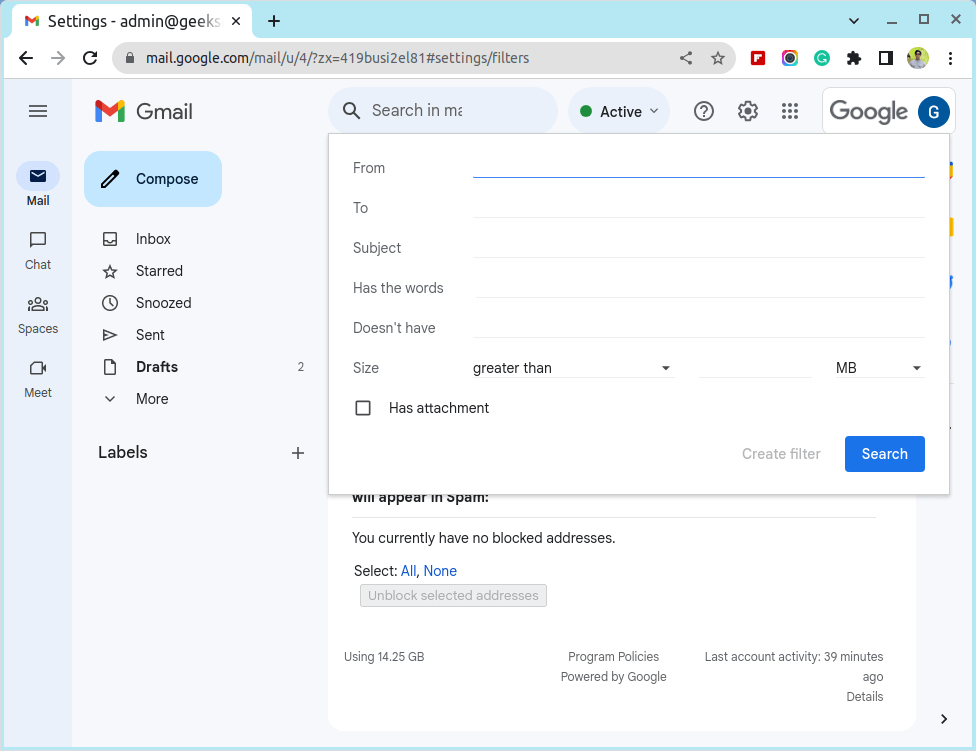
To create a filter, click the “Create a new filter” link, it will open a filter creation form with a list of attributes for setting the filtering criteria.
- From: Filters out incoming emails from specific email addresses.
- To: Filters emails sent to a specific email address.
- Subject: Filters out emails that contain a specific email subject.
- Has the words: Filters out emails that contain specific words.
- Doesn’t have: Filters emails that do not include specific keywords.
- Has attachment: Filters out emails that contain an attachment of any kind.
- Don’t include chats: Ignore chats from the chat application when applying the filters.
- Size: Filters emails that are either greater than or less than the specified size.
You can use either one or a combination of these options and once done, click the ‘Create filter‘ button.
To list the applied filters click the ‘Settings‘ icon and then select ‘See all Settings‘. Next, click the ‘Filters and blocked address‘ tab to view the filter.
11. Check Gmail Offline.
Did you know Gmail can be accessed even when you’re offline? With offline access enabled, you can stay productive and keep up with your emails even when you’re not connected to the internet.
It’s a great feature for travelers, commuters, or anyone who needs to stay in touch without constant internet access. It is also important to make sure to periodically connect to the internet to sync your emails and ensure you have the latest messages available offline.
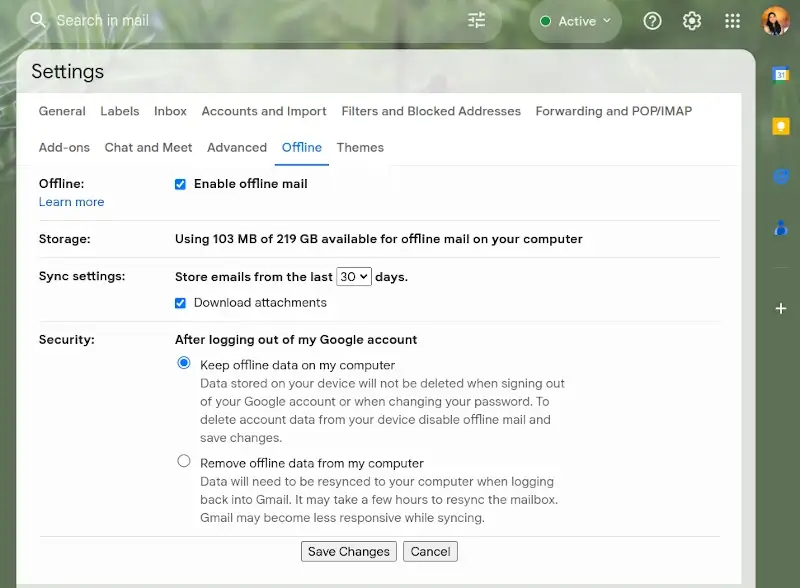
Here’s how to set it up:
- Open Gmail in your web browser while you’re still connected to the internet. Then, click the “Settings” option.
- In the Settings menu, select the “Offline” tab.
- Click on “Enable offline mail” to turn on offline access for your Gmail account.
- You can customize your offline settings by selecting options like how many days of emails to synchronize, keeping offline data on a computer, and whether to download attachments for offline access.
- Once done with customizing settings, scroll down to the bottom of the page and click “Save Changes” to apply them.
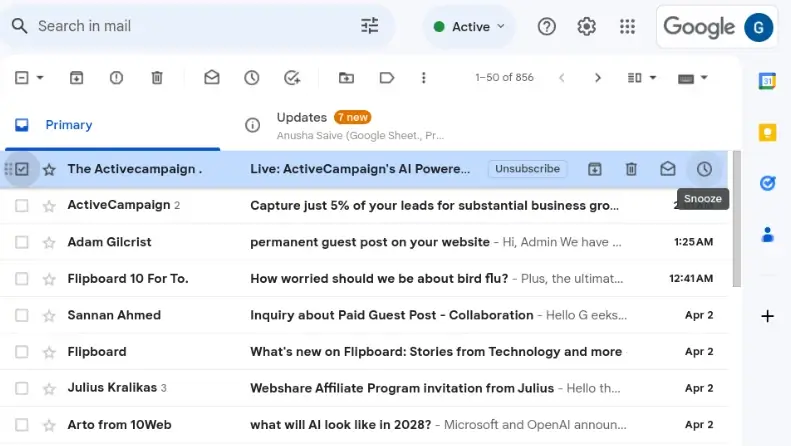
12. Snooze an Email
The snooze feature in Gmail lets you hide an email temporarily from your inbox and bring it back later when it’s more convenient. This feature helps you keep your inbox tidy, manage your email flow, and stay organized
Here’s how to snooze an email:
- Open a Gmail Account in your web browser or mobile app.
- Find and select the email you want to snooze.
- Look for the snooze button, which looks like a clock icon. Click on it.
- Select how long you want to snooze the email for, options such as later today, tomorrow, or next week, or you can choose a specific date and time.
- Once you’ve chosen a snooze time, click on it to confirm.
- To view snoozed emails, check the “Snoozed” label in Gmail’s sidebar or use the search bar to search for snoozed emails.
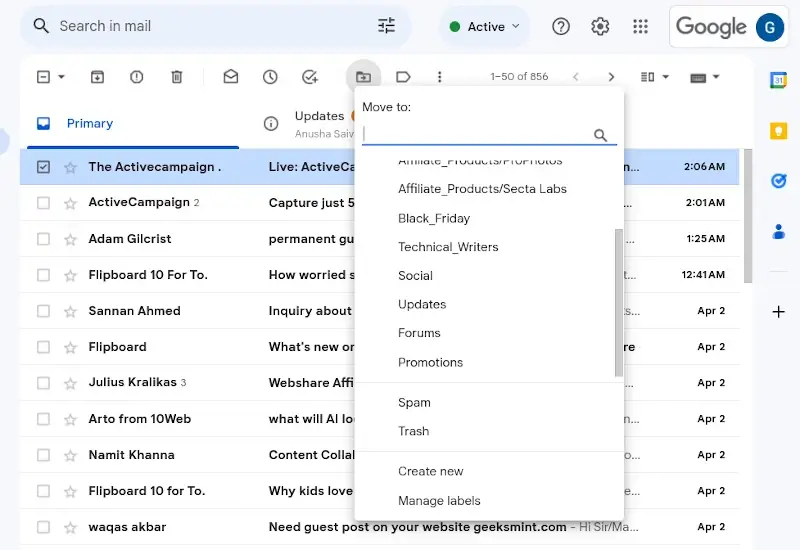
13. Use labels in Gmail
Labels in Gmail are a great tool to help you organize your emails and manage them better.
To start, you can create labels for different categories such as work, personal, finance, or travel. These labels allow you to group similar emails together, making it easier to find what you need.
You can also set up filters to automatically apply labels to incoming emails based on things like who sent the email, the subject, or specific keywords. This helps you sort your emails without having to do it manually.
To make things even easier, you can assign different colors to your labels. This makes it simple to see which emails belong to which category at a glance.
To use labels, just click on the “Labels” button in the toolbar and choose the label you want to apply. It’s that easy! With labels, you can keep your inbox organized and find important emails quickly and easily.
14. Use Gmail with Keyboard Shortcuts
Want to navigate Gmail like a pro without lifting your fingers off the keyboard? Gmail offers a bunch of handy keyboard shortcuts to help you breeze through your inbox and manage emails more efficiently and save time on managing your emails.
Make sure you first enable keyboard shortcuts on the General tab of settings. Practice using these shortcuts regularly will help you become a Gmail power user in no time!
Here are some of the Keyboard shortcuts:
- Press “C” to compose a new email and Press “D” to compose an email in a new tab.
- To send an email, press “Ctrl + Enter” (Windows) or “Cmd + Enter” (Mac).
- Navigate through emails using “J” to move to the next email and “K” to move to the previous one.
- Press “Enter” to open the selected email.
- <Press “Shift + Ctrl + B” to BCC recipients
- Use “E” to archive the selected email.
- Press “# + Shift + 3” to delete the selected email.
- Press “R” to reply and Press “A” to reply to all recipients of the selected email.
- Use “F” to forward the selected email to another recipient.
- Press “Ctrl + K” to insert a link.
- Press “Shift + U” to mark emails as unread and “Shift + I” to mark selected emails as read.
- Press “/” to move the cursor to the search bar, this allows you to quickly search for specific emails.
- Use “G” followed by “I” to refresh your inbox.
- Press “G” followed by “S” to open Gmail settings.
- After performing an action like archiving or deleting an email, press “Z” to undo it.
Conclusion
Those are some of the Gmail hacks that you can use to fire up your productivity while working. We hope you found this guide beneficial.