Do you want to save a recipe guide or key details in a text online? Screenshots come in handy in this kind of situation. With screenshots, it’s easy and quick to save information that you might use for future reference.
In this article, we will show you simple tricks you can employ to take screenshots on your Android device.
1. Using Power and Volume Down Buttons
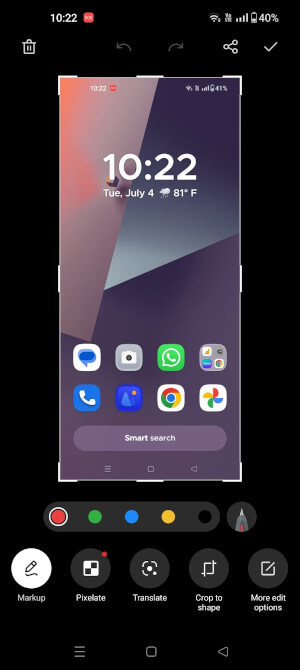
This is one of the easiest and most convenient ways of taking a screenshot on most Android devices. All you need is to simply press and hold down the combination Volume down and Power button keys simultaneously.
A pop-up will briefly appear confirming the successful screenshot capture. You will be provided with options for either editing the capture or simply saving it without any changes.
If you are using early versions of Samsung, press and hold down the Home and Power buttons to take screenshots.
Once the screenshot has been taken, head over to your gallery or Pictures folder to view them.
2. Using Home Settings
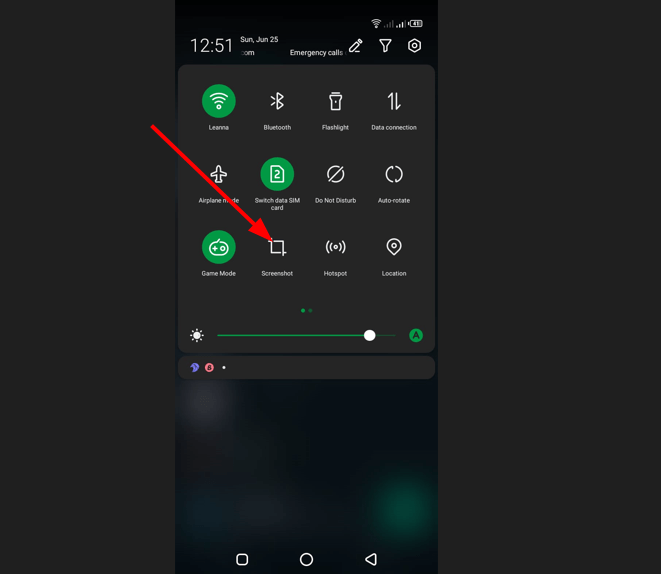
In addition to using the Volume Down and Power buttons, you can alternatively use the home screen settings to take a screenshot.
To accomplish this, simply swipe your screen from top to bottom and tap the ‘Screenshot‘ option.
3. Using Hand Gestures
For people who are using the Samsung Galaxy’s latest releases, you can use the palm swipe technique to take screenshots. First, go to settings and tap on advanced features.
Scroll down and tap on motion and gestures. Go ahead and tap the palm swipe to capture and turn the switch on.
Now, all it takes to take a screenshot is a 90-degree swipe of the hand across the screen.
4. Using Google Assistant
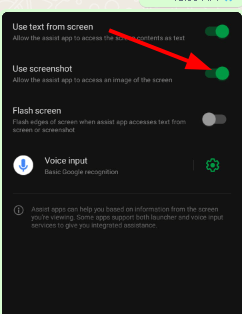
To take a screenshot using Google Assistant, switch on Use Screenshot in your Android settings.
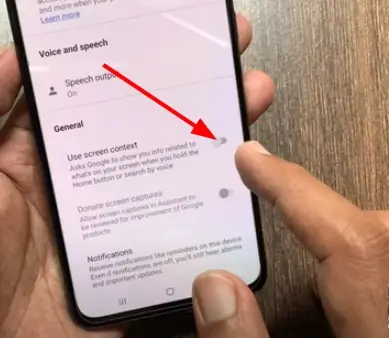
Go to Google Assistant settings and activate it by switching on ‘Use of Screen Context‘.
Now, navigate to the page that you want to take the screenshot of. Long press the home button on your screen and say ‘Take Screenshot‘. It instantly takes the screenshot and provides an option to share and save the screenshot.
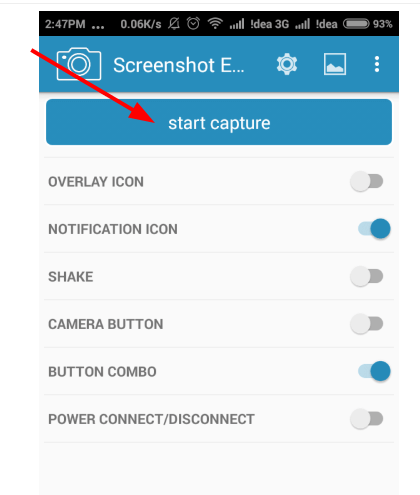
5. Using Third-Party Screenshot Applications
There are several third-party apps, such as AZ Screen Recorder, Super Screenshot, Screenshot Touch, Screen Master, and Screenshot Easy, that you can employ to take screenshots on your Android device.
Here, we are going to use Screenshot Easy for demonstration purposes.
To get started, head over to the Play Store to download and install the ‘Screenshot Easy‘ app. Next, open the application and tap ‘Start Now‘.
This ushers you to the application’s home page. To proceed, select ‘Start Capture‘.
To take a screenshot, go to the page or image you want to screenshot and tap ‘Capture‘ on the notification bar on top of your screen, which says Click to take a screenshot.
After taking screenshots, the application offers the option to share, edit, and save the screenshots.
Conclusion
Select a way that suits you and take screenshots on your Android phone using the above methods. However, not all methods will apply to your devices because every Android phone has its own features that the manufacturer has incorporated.