You don’t necessarily need to be a gifted artist to design compelling imagery anymore. With just a few prompts, you can generate aesthetically appealing images in a matter of minutes. The secret is Midjourney.
Midjourney has taken the generative AI industry by storm. It has earned itself a spot alongside some of the best AI systems out there, such as DALL-E and Stable Diffusion.
Midjourney utilizes the power of generative AI to do much of the heavy lifting. All you have to do is provide it with a brief text description of the type of image you have in mind, and it will generate it.
When Midjourney was launched, it allowed users to create an unlimited number of images. Unfortunately, the website terminated the free trial, citing a spike in new users as the reason.
This leaves you with only one option, and that is to sign up for one of the subscription plans.
Now, let’s see how you can leverage Midjourney to generate your images
1. Join the Midjourney Discord Server
Discord is an all-in-one communication platform designed for communities, gaming, and socializing. With Discord, users can join servers based on their interests, where they can engage in discussions, share media, and collaborate on projects.
Here’s a step-by-step guide on how to get started:
If you don’t have a Discord account yet, you’ll need to create one. If you already have an account, simply login to proceed. Once you’re logged in, locate the Discord server dashboard.
In the dashboard click the “+” tab to proceed. This step allows you to link your Discord account to the Midjourney server. Follow the prompts or instructions provided to complete the linking process.

A pop window will appear with various options to choose from. Click on “Join a Server“. Next, click “don’t have an invite“. This option allows you to browse the servers you want to join.
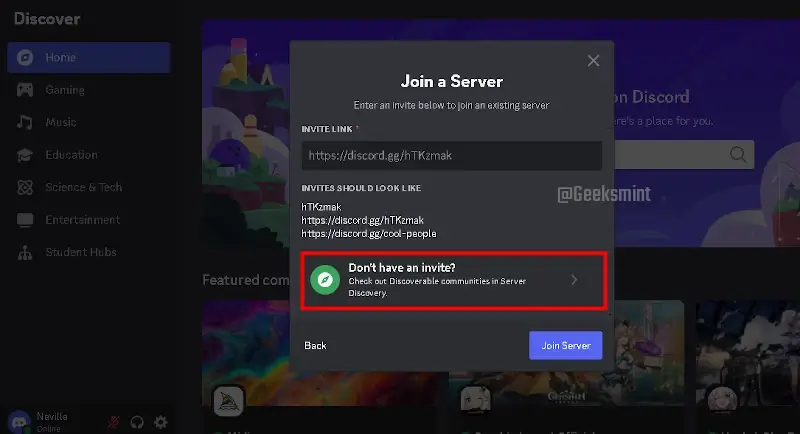
Locate Midjourney in the featured communities.
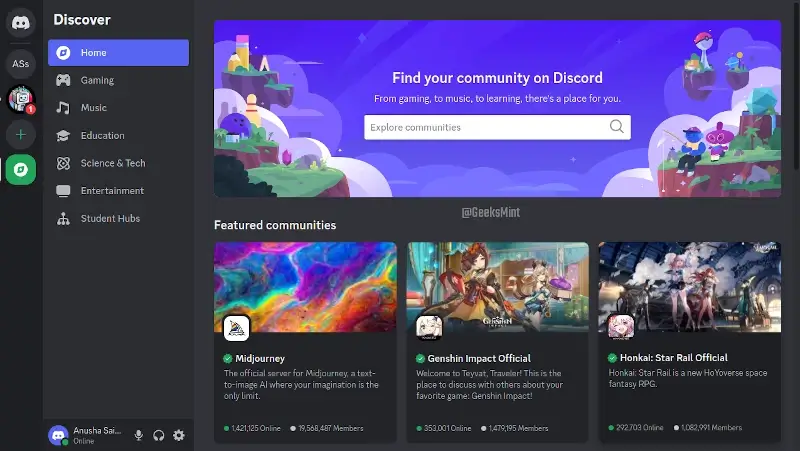
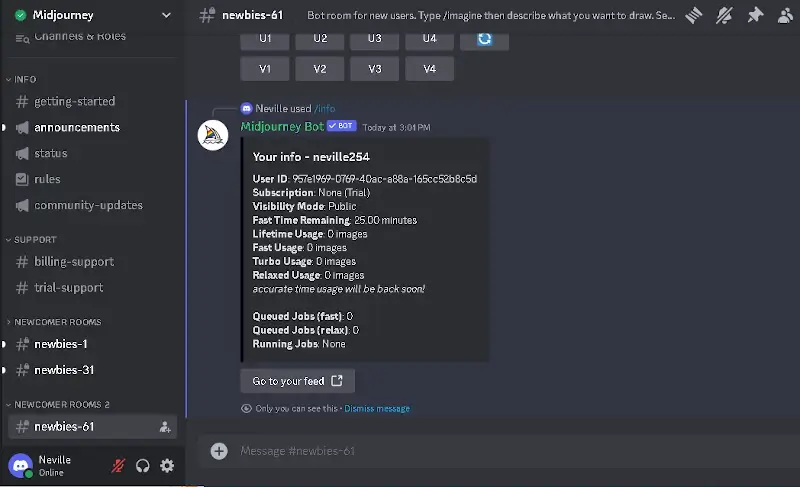
After clicking on “Midjourney” you’ll be directed to the Midjourney Discord server. As a free member, you won’t be able to create images, but you can still explore the interface to familiarize yourself with its layout.
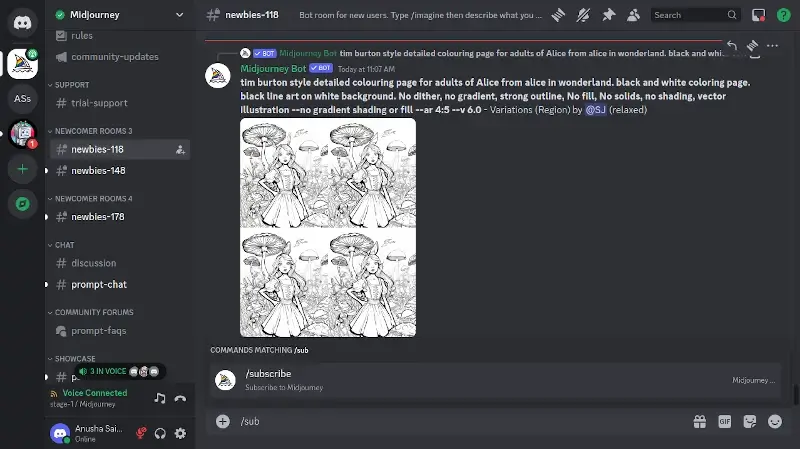
To understand how Midjourney works, consider visiting different rooms such as “Theme Image Gen“, “Newcomers Room” or “Thread Channels” and checking out artwork shared by other users.
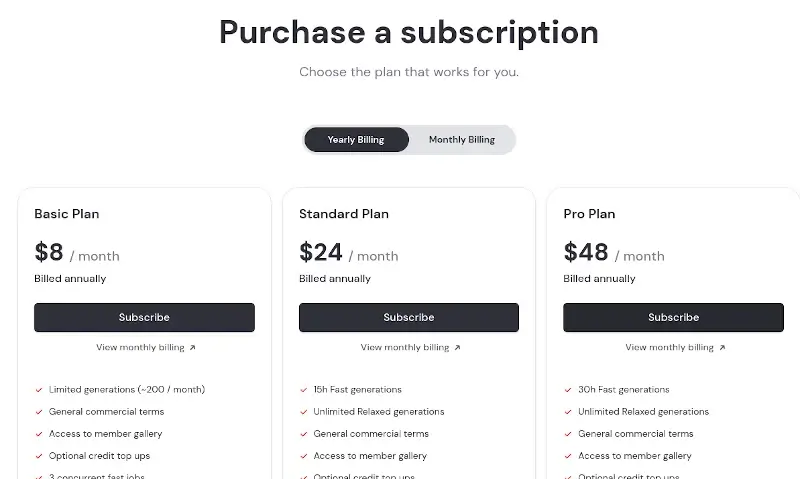
2. Purchase a Midjourney Subscription
To access the full features and generate art on Midjourney, you’ll need to subscribe to a Midjourney subscription. Here’s a straightforward method to do so:
Look for a text prompt positioned near the bottom of the screen. Click on it and start typing “/subscribe” to initiate the subscription process.
Upon clicking this, you’ll encounter the subscription prompt, giving you the option to subscribe to one of Midjourney’s premium plans. Once you’ve chosen “Subscribe to Midjourney” simply press the “Enter” key on your keyboard.
The bot will then direct you to the subscription page, allowing you to select a plan that aligns with your needs.
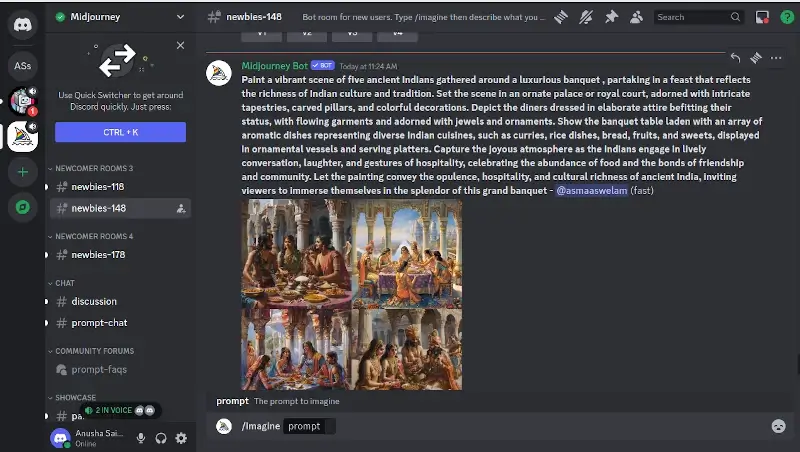
3. Creating AI Art with Midjourney
Before embarking on your journey to create unique AI art, it’s essential to familiarize yourself with some fundamental commands. To generate an image, begin by typing the “/imagine” command followed by the prompt.
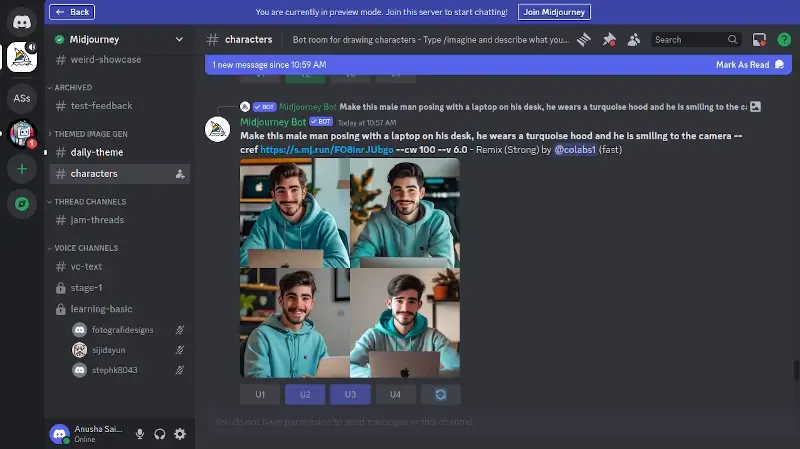
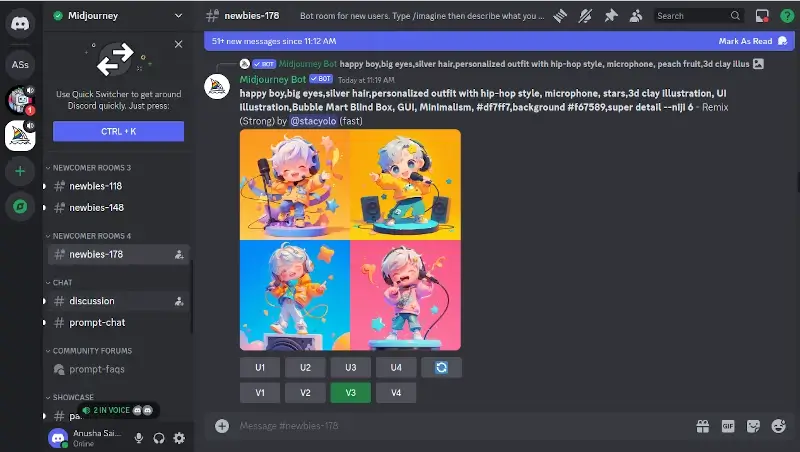
4. Customizing Midjourney AI Art
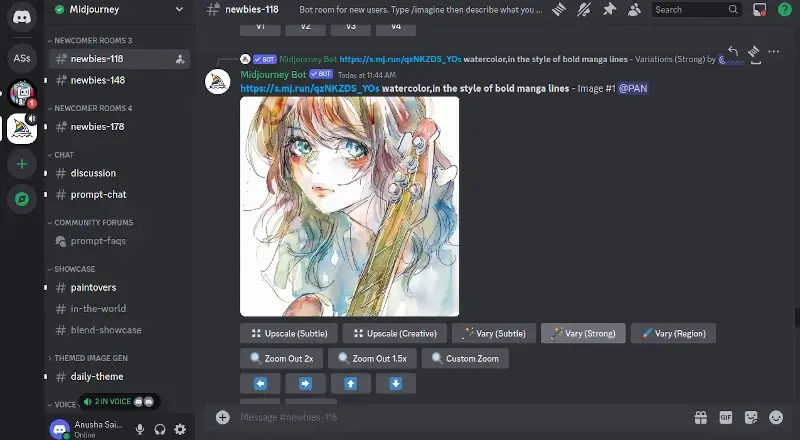
In the above images, you’ll notice four buttons labeled “U1, U2, U3, and U4“. These buttons represent the upscaling customizations provided by Midjourneyaimed to enhance the resolution and quality of the image.
On the first row’s right side, you will find the “regenerate” button. If in case you’re not satisfied with the initial set of images generated by Midjourney, you can leverage this option.
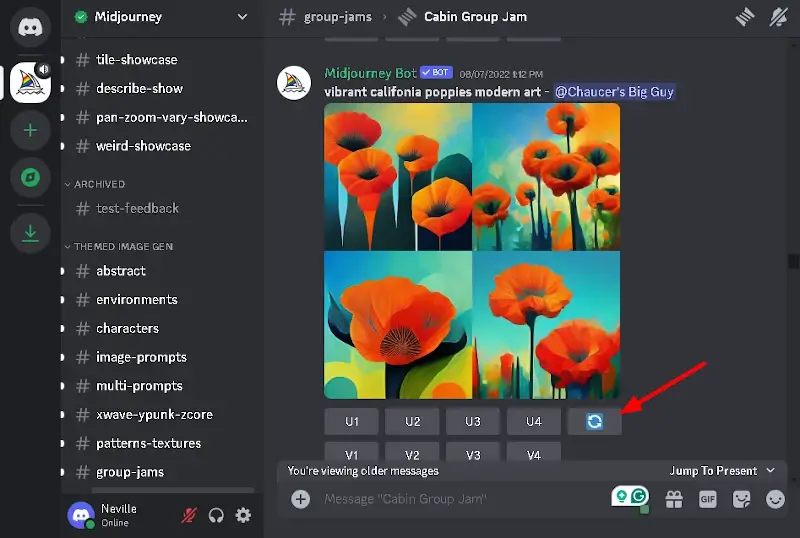
Lastly, the second row contains buttons used for variations. You can select the button that corresponds to the image you want to create variations for by choosing V1 up to V4.
Once you have clicked the variation number, Midjourney generates a variation of the image accordingly
Midjourney offers several upscaling options for you to explore. One such option is Upscale (Subtle), which enlarges your photo while preserving its original features.
Another choice is Upscale (Creative), which also doubles the size of your image while adding new and creative details
You can adjust the height and width of your images using the aspect ratio command. By default, Midjourney generates square images with a resolution of 1024 x 1024 pixels.
However, if you want to create a picture that isn’t square, you need to specify an aspect ratio. For example, to produce an image with a 9:16 aspect ratio, you can use a prompt like this – “Happy Mother’s Day, Gray gold background, art, sketch –ar 9:16“.
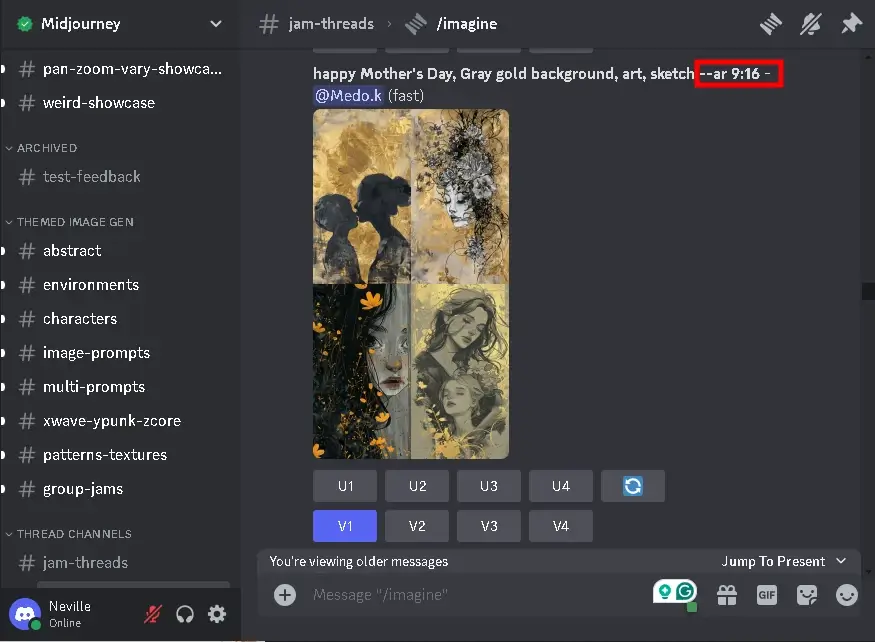
With the release of Midjourney version 5, some commands have become inactive. Notably, parameters like width (–w) and height (–h) are no longer operational. You can find a comprehensive list of available options for the /imagine command are listed here.
5. Advanced Prompts
Midjourney offers image prompts, which you can use to upload one of the images that you want to generate. You can use image prompts alone or in conjunction with text prompts for the most interesting effects, try combining images of various styles. You can check how it is done here.
Remix is another tool at your disposal for altering model versions, aspect ratios, parameters, and prompts. Remixing can be used to change the lighting, develop a central idea, or produce unique compositions. You can type /prefer remix to activate remix mode.
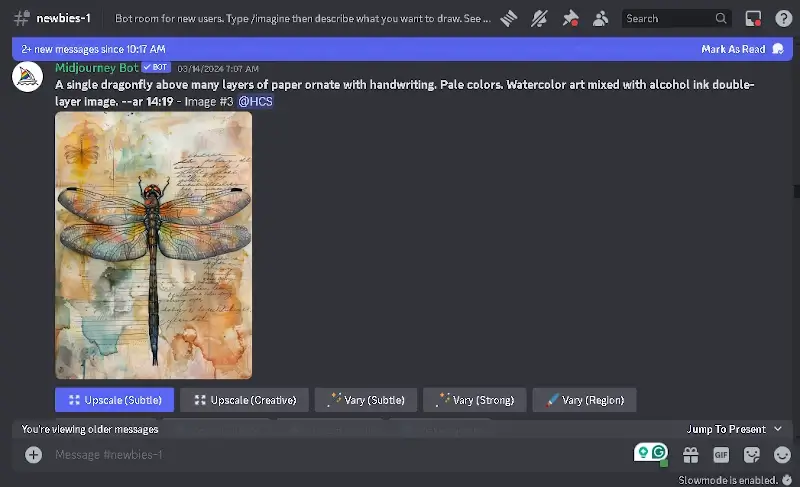
For instance, we’ll create a single dragonfly above many layers of paper with handwriting, Pale colors, and Watercolor art mixed with alcohol ink double-layer image – -ar 14:19.
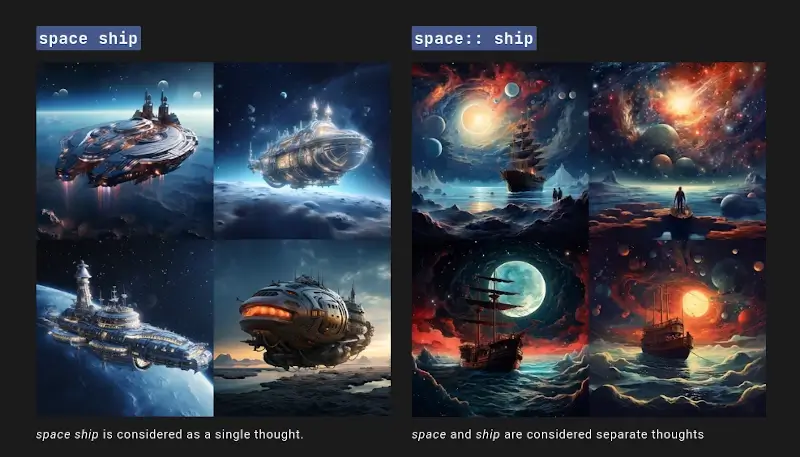
There are also multi prompts, which allow you to define more than one concept during image creation using a double colon (::) option within your prompt.
For example, For the prompt space ship, these words are assumed to be one, and the Midjourney generates images of spacecraft from science fiction.
If the prompt is separated into two pieces, space:: ship, both words now are assumed to be independent and then combined as one by Midjouney to generate a sailing ship traveling through space.
Lastly, you can create different versions of a single /imagine command by using permutation prompts. You can create numerous versions of a prompt with different combinations of options by inserting lists of options within curly braces {} and separated by commas.
The figure below shows how this prompt is used.
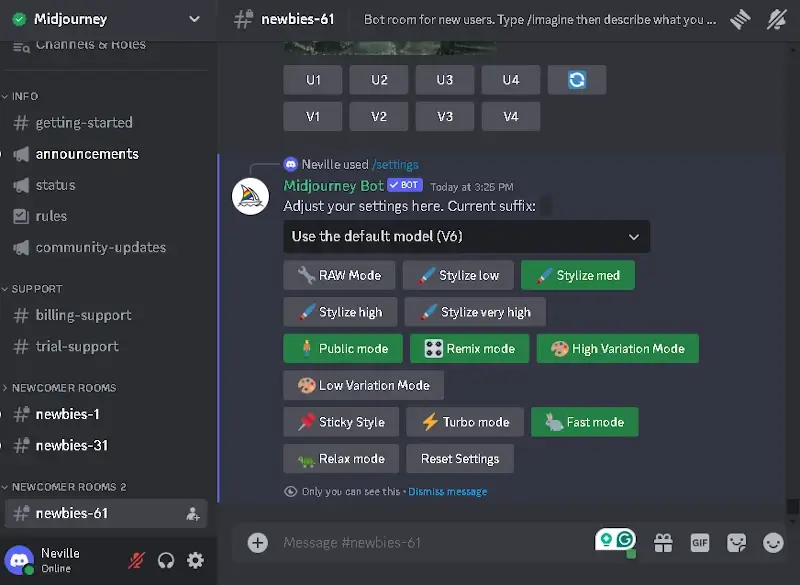
7. Fast and Relaxed Mode
The Fast Mode option in Midjourney generates photos quickly, however it has a time restriction. This restriction is used whenever you generate images on the basic plan or choose it on other plans.
On the other hand, the Relaxed mode allows you to create an infinite number of images, but your requests will be queued after those of other users. In addition, the standard and pro plans are the only ones that offer Midjourney’s relaxation mode and the basic plan does not.
To enable these modes, you can type and enter “/settings” in the text box or in the bot’s direct message. Midjourney will instantly display a variety of settings, from which you can select between the Turbo and Relax modes.
8. Adding Midjourney to Your Discord Server
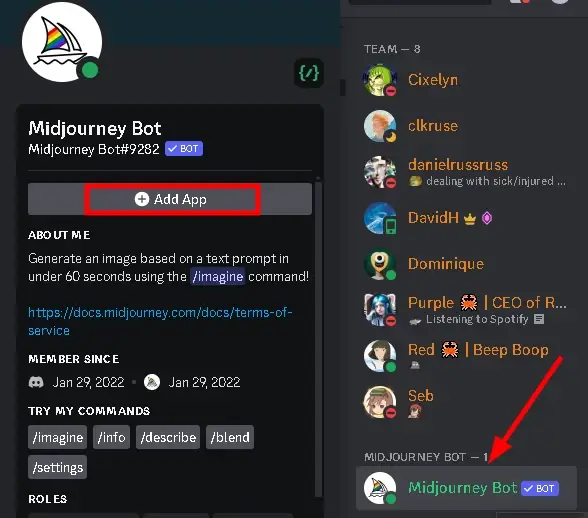
You must visit the official Midjourney Discord server if you want to generate AI images. However, did you know that you avoid all that hassle by adding the Midjourney to your own server?
On the Midjourney Discord server, select the “Show Member List” option located in the upper right corner. This will disclose the members, along with the official Midjourney bot.
Next, select the Midjourney bot from the list that displays, and then click the “Add to app” button.
Here’s how to proceed:
- Choose your server from the drop-down menu provided.
- Click on “Continue“
- Lastly, to authorize all necessary permissions, click the “Authorize” button.
Conclusion
We hope that our comprehensive guide on Midjourney AI art will inspire you to produce some amazing works of art. However, keep in mind that Midjourney has practically infinite potential, so you can keep experimenting with the service to produce even more artistic creations.
What are your thoughts on using Midjourney for AI art generation? Your suggestions are welcomed.