YouTube is a popular place to watch all kinds of videos, but sometimes, the stuff that shows up in your feed isn’t what you like. If you’re tired of seeing videos from certain channels that you’re not interested in, don’t worry! This article will show you easy ways to block those YouTube channels from appearing in your feed.
While YouTube doesn’t offer a direct built-in option to block specific channels, several practical workarounds can significantly reduce their prominence in your recommendations.
From utilizing the “Not Interested” feature to tweaking your YouTube preferences and even exploring third-party browser extensions, we’ll walk you through the step-by-step process to curate a personalized and enjoyable YouTube feed.
Say goodbye to unappealing videos and reclaim your viewing pleasure with these simple yet effective techniques to tailor your YouTube journey according to your interests.
Block YouTube Channels from Feed
One of the easiest ways to block YouTube channels from appearing in your feed is by using the “Not Interested” feature, which allows you to give feedback to YouTube about videos that don’t interest you or that you’d rather not see.
Here’s how to use the “Not Interested” feature:
When you come across a video from a channel you want to block, look for the three-dot menu (ellipsis) located next to the video’s title or below the video itself. This is just an example of where you can find the ellipses.
Click on the three-dot menu, and a drop-down menu will appear. Choose the “Not Interested” option from the list.
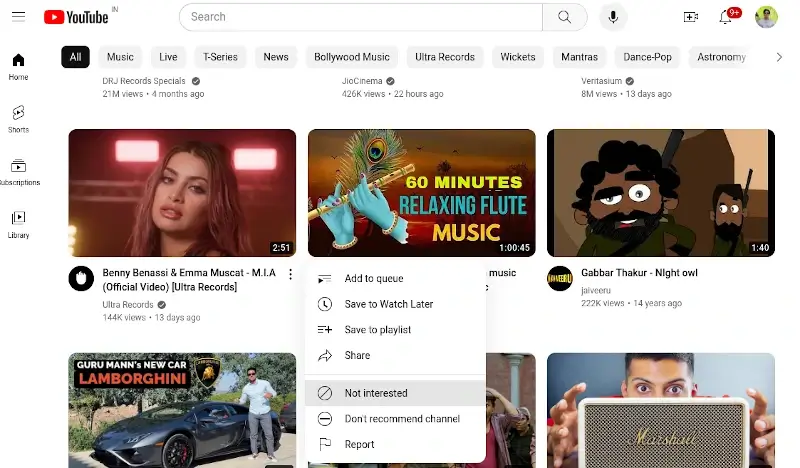
Once you click “Not Interested” YouTube will display a confirmation message “Video Removed”, letting you know that the video has been removed from your recommendations.
YouTube might ask you for additional feedback, such as whether the video is “Too long” “Not interested in the channel” or “Don’t recommend the channel“. You can choose one of these options to specify your reason.
While the “Not Interested” feature doesn’t guarantee that you’ll never see videos from that channel again, it does influence YouTube’s algorithm to show you fewer videos from the channels you mark as uninteresting.
Using this feature regularly for videos and channels you genuinely want to avoid can gradually improve the relevance and enjoyability of your YouTube feed. Combined with other methods to customize your recommendations, the “Not Interested” feature empowers you to tailor your YouTube experience to your liking.
Modify Your YouTube Recommendations
Customizing your YouTube recommendations is another effective way to block unwanted channels from appearing in your feed. Modifying your watch history and search history will influence YouTube’s algorithm and ensure that you receive content that aligns better with your interests.
Clear YouTube Watch History
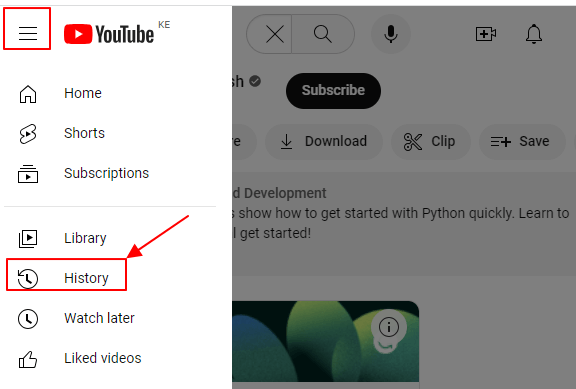
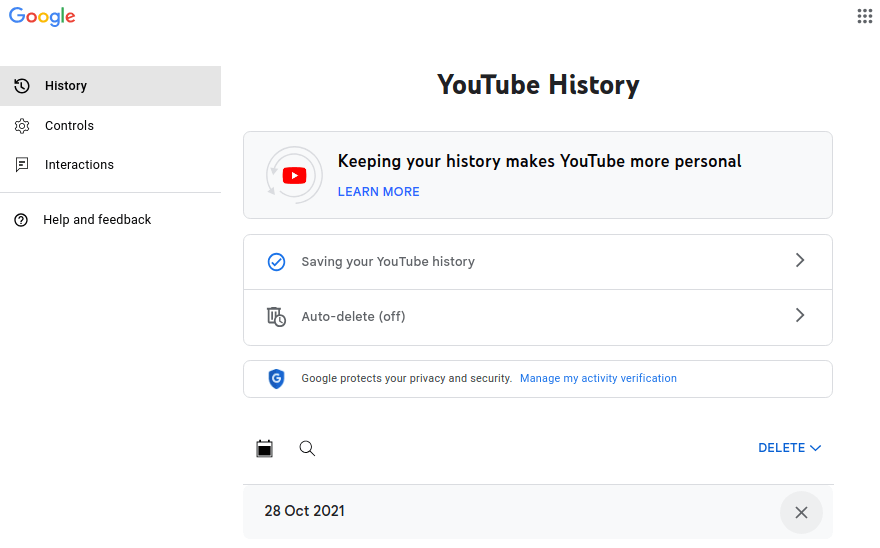
Sign in to your YouTube account and go to the homepage. Click on the three-line menu in the top-left corner, then select “History“.
Next, click “Clear all watch history” or “Pause watch history” to stop YouTube from tracking your viewing activity. Clearing your watch history prevents YouTube from basing recommendations on the videos you previously watched.
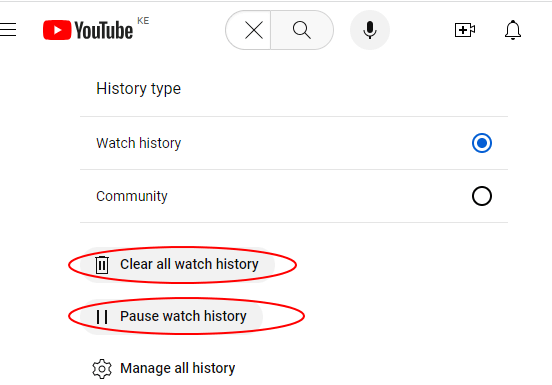
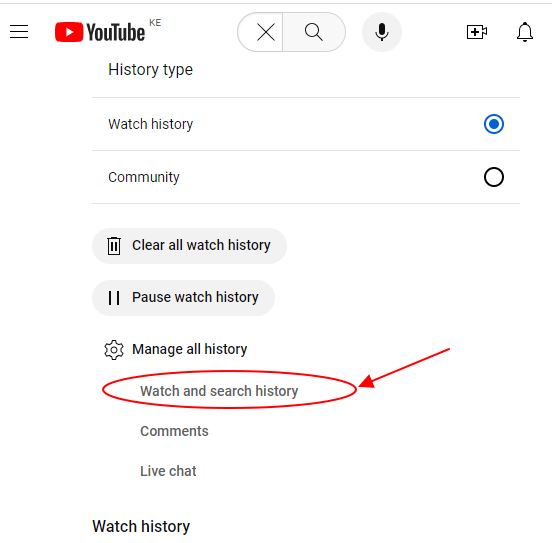
In the same “History” section, click on “Watch and search history” to manage your search history. This action stops YouTube from using your search queries to influence future recommendations.
If you don’t want to clear your entire history, you can delete specific videos and searches one by one. Simply click the watch and search history before you click on the “X” sign next to the video you intend to delete.
After clearing your history, focus on watching videos you genuinely enjoy. When you watch content that interests you, YouTube will learn your preferences and suggest similar videos, helping to exclude unwanted channels.
Ideally, adjusting your watch and search history provides YouTube with fresh data, enabling it to offer better-tailored recommendations. Over time, the platform will be more attuned to your preferences, reducing the appearance of content from channels you’d rather not see.
Remember that it may take some time for the changes to take full effect, so be patient as YouTube fine-tunes your recommendations based on your new viewing habits.
Give Feedback to YouTube
Providing feedback directly to YouTube is an essential way to voice your preferences and concerns, helping the platform understand what content you want to see and what channels you wish to avoid.
While YouTube doesn’t have a specific option to block channels, your feedback can still have an impact on improving your overall viewing experience.
Here’s how to give feedback to YouTube:
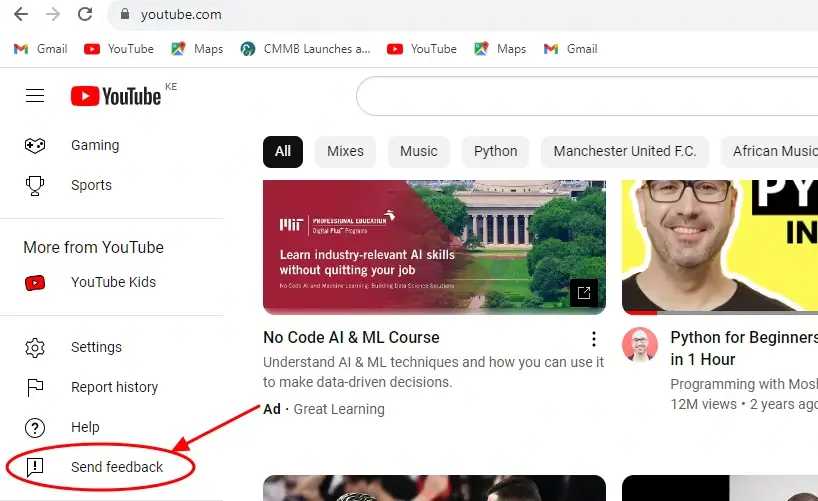
On the YouTube website or app, scroll down to the bottom of the page, and you’ll find a link labeled “Send feedback” Click on this link to access the feedback form. You can also get it by clicking on the three-line menu at the top left to access this.
A dialogue box will pop up on which you can describe your feedback. See the sample screenshot. YouTube’s feedback form covers various topics, so choose the category that best fits your feedback.
If you want to express your dislike for specific channels or types of content, consider selecting categories related to “Recommendations” or “Video Suggestions“.
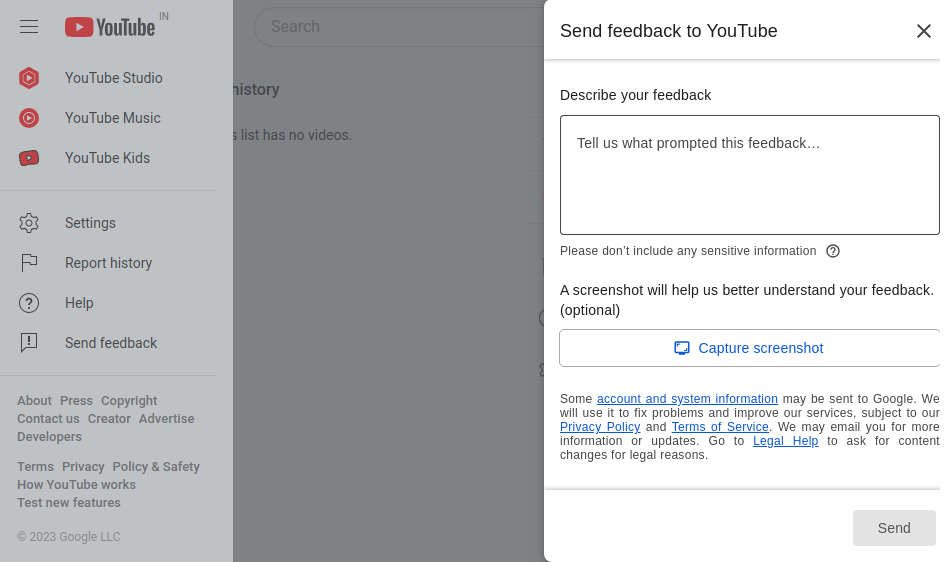
After composing your feedback, click the appropriate button to submit it. You can also click on the provided box to allow them to email you. However, this is optional. YouTube will receive your comments, and while they may not respond individually, they do take user feedback into account when refining their algorithms.
While this method doesn’t guarantee an immediate resolution, YouTube does value user feedback and uses it to improve the platform’s recommendation system. The more users provide feedback about certain channels or content, the more likely YouTube will fine-tune its suggestions to better suit your preferences.
Use YouTube’s Restricted Mode
YouTube’s Restricted Mode is a useful tool to limit the visibility of potentially mature or inappropriate content in your feed. While it doesn’t specifically block channels, it helps ensure a safer browsing experience, especially for younger viewers or users who prefer to avoid certain types of content.
Here’s how to enable YouTube’s Restricted Mode:
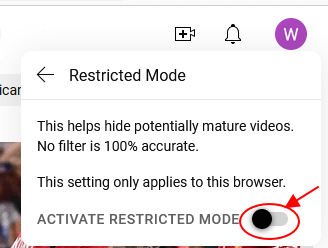
Make sure you’re signed in to your YouTube account to access your settings. Scroll down to the bottom of any YouTube page, and click on the “Restricted Mode” option.
Toggle the switch next to “Activate Restricted Mode” to turn it on. You may be prompted to enter your YouTube account password for confirmation.
After enabling Restricted Mode, scroll down to the bottom of the page and click on “Save” to apply the changes to your account.
Once activated, Restricted Mode will automatically filter out content that may contain mature themes, explicit language, or sensitive topics. However, it’s important to note that Restricted Mode isn’t perfect, and some content might still slip through or get unintentionally filtered out. YouTube relies on automated systems and community feedback to determine which videos to restrict.
While YouTube’s Restricted Mode is primarily designed for a safer viewing experience, it may indirectly help reduce the appearance of content from certain channels that regularly produce explicit or mature content.
Keep in mind that this feature is not foolproof, and combining it with other methods mentioned earlier can provide a more comprehensive approach to curating your YouTube feed.
Conclusion
Taking control of your YouTube feed and blocking unwanted channels is achievable through a combination of simple yet effective methods.
While YouTube might not offer a direct option to block specific channels, leveraging features like “Not Interested” modifying your watch and search history, giving feedback, and enabling Restricted Mode can significantly enhance your viewing experience.
Though no method is foolproof, combining these strategies creates a more personalized and enjoyable YouTube experience. Remember that YouTube continuously updates its algorithms, so stay informed about new features that may be introduced to further customize your feed.
Take charge of your YouTube journey, and with these techniques, revel in a feed filled with captivating and relevant content that truly resonates with you. Enjoy exploring the vast world of YouTube, now tailored to suit your unique tastes and interests.
What the hell are you talking about when you say “While YouTube doesn’t offer a direct built-in option to block specific channels”
There is a button that lets you block a channel from your feed on every video.
@Sinwar,
I appreciate your input, and you’re correct that YouTube provides a way to manage your content preferences. However, it’s worth noting that the term “blocking” can have different interpretations.
While YouTube allows users to hide content from specific channels, it doesn’t completely block or prevent those channels from existing or appearing elsewhere on the platform. It’s more of a filtering option for personalizing your experience rather than a strict block.